Monday, October 26, 2009

Seared Sesame Ginger Tuna with Curried Quinoa


Just so you know, in my house, I'm always the adventurous eater. I'm constantly trying new things that I see in stores, especially when I come home from Whole Foods. It's a magical place for me, that Whole Foods. Just standing in front of those bulk bins makes the wheels in my head start turning, and I always think of the things I can make with the contents. Then I spied the quinoa.

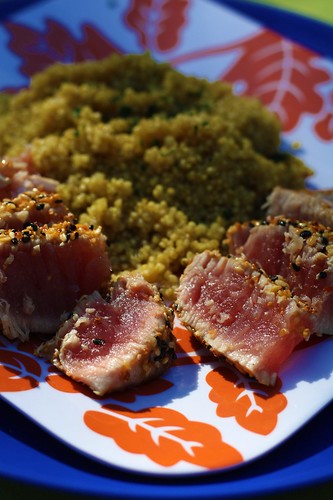
For those inquiring minds.... quinoa is a grain. People think it's like cous cous (which is a pasta), but it's actually not. Quinoa is gluten free, and has a very high protein and fiber content, making it popular with the Vegan crowd. It's great option for those that are looking to eat healthier, and works as a good substitute for white rice or cous cous! But enough on quinoa.... let's get to the cooking.

I also picked up a bag of frozen yellowfin tuna steaks when they were on sale at Whole Foods a few weeks back. Dad's been nagging me to cook the last one from the freezer since then. I thawed the tuna steak for about an hour before it was ready to cook. I patted the fish down, removing the moisture from the outside. Then I started pressing on this "Sesame Ginger Crusting Mix" that I picked up at TJ Maxx in the gourmet foods aisle. I used it previously on my Seared Tuna Salad recipe. I seared it in a hot pan for about 45 seconds to a minute on each side, including the sides of the steak! Remove from the pan and set aside.

Before you use the quinoa, make sure that you give it a good rinse or a short soak.. Quinoa is covered in a bitter coating called Saponin that you will need to remove if you bought it in bulk. Most of the Quinoa that is in a box has been pre-rinsed.

You will use a 2 part liquid-1part quinoa ratio. I used a cup of quinoa, so I use 2 cups of low sodium chicken broth as my cooking liquid for more flavor. I also added a teaspoon of curry powder, a small bit of chopped shallots and parsley, and garlic pepper and salt to taste. Cook until the liquid has been absorbed into the quinoa, and it is tranluscent.

Friday, October 23, 2009

Martha Stewart's Perfect Roasted Chicken


Consider this one an essential recipe. Everyone should know how to make a roast chicken. It's such a simple meal, most everyone will love it and the directions couldn't be any easier. And you can make it YOURS just by changing the flavors.

What you'll need:

  • A roaster chicken ( these were on sale for 2.99 each at Target a few weeks back!)
  • 2 TBS of unsalted butter, softened
  • salt and pepper
  • 1 lemon
  • 3 garlic cloves, smashed
  • herbs of your choice ( I used rosemary and thyme)

Once thawed, let your chicken come to room temperature by letting it sit out for 30 minutes to an hour, depending on the size of the bird. Pre-heat your oven to 425°. Wash the chicken, and then you will need to dry it. Why dry it? Because meat browns better when it's dry!

Your next step is to remove any of the giblets, etc party favors inside the chicken. Then salt and pepper the cavity. Throw in your lemon wedges, garlic, and herbs. Then you'll need to truss the chicken. (Click here for a video showing you how to do that) Once trussed, grab that softened butter and give the chicken a good rub down all over. Liberally sprinkle the buttered surface with salt and pepper, and place the bird breast side up in a roasting pan.

I like to have some sort of root veggies cooking along with the chicken, so I found some yellow creamy new potatoes, chopped them in quarters, tossed in olive oil, salt, pepper, and thyme. I put them in the pan surrounding the chicken, and added a splash of white wine. Sounds weird, but trust me on this, it's a great step not to miss.

Roast the chicken in your 425° until the skin is golden brown and the juices run clear when pierced, and that took me about an hour and a half. If you're not sure, use a thermometer and the breast should read at 180° and the thigh should be 190°.

As tempting as it may seem to cut right into that chicken, WAIT. Let that beautiful bird sit for 10-15 minutes so the juices have time to re-distribute throughout the chicken. This is a mistake many people make after cooking meat and they wonder why it's dry. Remember this step!

Slice and enjoy, and turn your leftover chicken into a delicious chicken salad the next day :)

Recipe was from Martha Stewart's Cooking School, which I HIGHLY recommend if you're a new or semi-pro home cook!

Tuesday, October 13, 2009

Easy Grilled Pizza


Recently, a close friend invited me over to visit while she was housesitting. She warned me before I got there, that the kitchen was something of dreams. Well I didn't believe it until I saw it for myself.


Walking into the kitchen, my mouth dropped and I started to drool. DUAL OVENS. GAS COOKTOP. WALK IN PANTRY. Be still my heart. And what's even sadder is that most people that have kitchens like this don't even COOK IN THEM. For shame.


Well I decided to put it to good use. I was inspired by my gal pal Ina Garten to make a grilled pizza. It turned out so perfect and it honestly was so simple!

Things you'll need:

Package of pizza dough from your supermarket (mine sells it in the bakery)
Extra Virgin Olive Oil
Toppings of your choice

Preheat your grill to a medium-high heat. Make sure your grill is clean, because you'll be placing the pizza directly onto it.

Prep your dough by letting it sit out for an hour before using, giving it time to rise. Once the hour is up, shape into individual sizes.

Place it down on the grill. Cook for 1 minute on the 1st side. While it's cooking, brush the uncooked side with EVOO.

Flip the bread over and start to layer on your toppings. I used tomato sauce, caramelized onions, pepperoni, fresh buffalo mozzerella, and fresh basil. Cover grill for 5 minutes to let cheese melt. Remove and enjoy!

I tried it for my mom's birthday the following week and expiremented with pizza toppings. The crowd favorite was the BBQ chicken pizza made with caramelized onions, leftover roast chicken, cheddar cheese, and BBQ sauce.