Showing posts with label easy. Show all posts

Wednesday, April 20, 2011

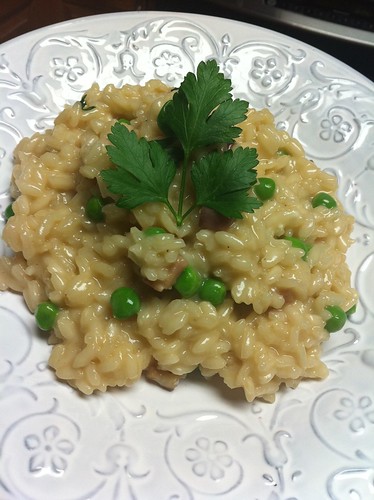
Pancetta and Pea Risotto

218241_747452497292_25100176_38589913_4013091_o


Oh Jamie Oliver, you always inspire me. Whether it's from "Jamie at Home" , "Jamie's Food Escapes", or even his "Food Revolution", he inspires me to be adventurous and try new things.

On one of his recent episodes of "Jamie's Food Escapes", he traveled to Venice where he made this incredible array of risottos from one basic recipe. I decided it was high time to rid my fear of making risotto and dive in to the deliciousness.

Basic Risotto Recipe (adapted from Jamie Oliver):
32 oz chicken stock (I used Progresso Tuscan Chicken Stock, yum!)
1 TBS butter
2 TBS olive oil
1 large onion, finely chopped
2 cloves garlic, finely chopped
1/2 head celery, finely chopped (confession, I left this out and it's still fine!)
14oz of risotto rice ( I get it in the bulk bin at Whole Foods, it's called Arborio rice)
2 glasses of white wine (about a cup to a cup and a half)
Salt and pepper to taste
2 TBS butter
1/4 cup grated parmesean cheese

Directions:
1. Heat the stock. In a separate pan heat the olive oil and butter, add the onions, garlic and celery, and fry very slowly for about 15 minutes without colouring. When the vegetables have softened, add the rice and turn up the heat.

2.The rice will now begin to lightly fry, so keep stirring it. After a minute it will look slightly translucent. Add the wine and keep stirring — it will smell fantastic. Any harsh alcohol flavours will evaporate and leave the rice with a tasty essence.

3. Once the wine has cooked into the rice, add your first ladle of hot stock and a good pinch of salt. Turn down the heat to a simmer so the rice doesn’t cook too quickly on the outside. Keep adding ladlefuls of stock, stirring and almost massaging the creamy starch out of the rice, allowing each ladleful to be absorbed before adding the next. This will take around 15 minutes. Taste the rice — is it cooked? Carry on adding stock until the rice is soft but with a slight bite. Don’t forget to check the seasoning carefully. If you run out of stock before the rice is cooked, add some boiling water.

4. Remove from the heat and add the butter and Parmesan. Stir well. Place a lid on the pan and allow to sit for 2 minutes. This is the most important part of making the perfect risotto, as this is when it becomes outrageously creamy and oozy like it should be. Eat it as soon as possible, while the risotto retains its beautiful texture.


Variations :


  • I added cubes of pancetta while the veggies were cooking, then added blanched peas at the end.

  • You could use leftover rotisserie chicken with some steamed asparagus.

  • crushed tomatoes with sliced basil

  • roasted butternut squash for the fall

  • sautee some sliced cremini mushrooms in marsala wine and mix in at the last minute.

  • Get creative!

Sunday, March 20, 2011

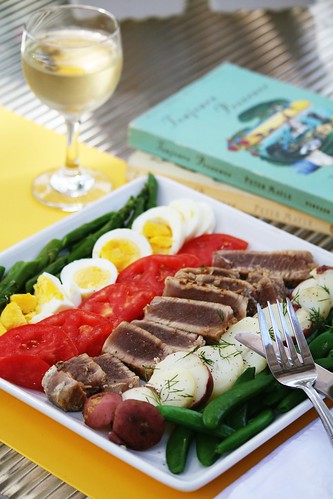
Easy Salad Niçoise


IMG_4448

Feeling inspired by a recent Barefoot Contessa episode and my recent haul from the Riverside Arts Market, I decided to throw together a Salad Niçoise for lunch.

A traditional salad niçoise features canned tuna, olives, and french haricot verts to what I've shown here. I had some fresh sugar snap peas and asparagus from the market, so I used that in place of the haricot verts. I made Ina Garten's Mustard Vinigarette to pour over the top of this.

All of the green vegetables were blanched, the potatoes and eggs were boiled, the tuna was seared (1-2 minutes on each side in a lightly greased pan).

I love how pretty this looks arranged on the plate and this would also be a great dish to serve at a party, like a wedding shower. It's fresh, beautiful, and best of all... delicious!

Wednesday, October 27, 2010

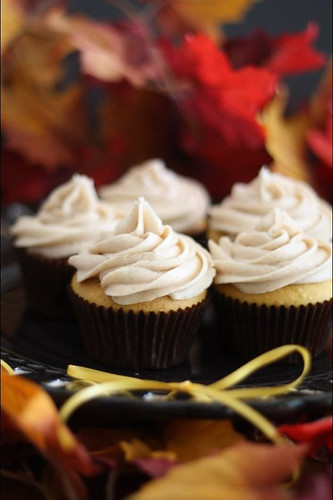
Pumpkin Spice Cupcakes

Pumpkin Spice Cupcakes with Cinnamon Maple Cream Cheese frosting


This recipe is so delightfully simple and perfect for a lazy Sunday when the weather has cooled off. Make some of these, brew a pot of coffee, and grab your nearest book. I promise you'll have a good day.

Cupcakes:
1 box yellow cake mix
1 15oz can of pumpkin (NOT pumpkin pie filling)
1 cup water
1 1/2 tablespoons cinnamon

Mix all ingredients on low for 30 seconds, then mix on medium speed for 2 minutes. Scoop into cupcake liners and bake for at 350 degrees for 17-19 minutes, until a toothpick comes out clean. Place on wire rack to cool.

Frosting:
1 8oz block cream cheese
2 teaspoons of vanilla
1 tablespoon cinnamon
3/4 of a 1lb bag of powdered sugar

Mix all ingredients until smooth and pipe onto cooled cupcakes.

Sunday, September 19, 2010

Easy Key Lime Pound Cake


Anytime there's a bake sale at my work, I always get asked to bring a little something. I decided to switch it up from my normal goods and bring a pound cake. I have a great and super easy pound cake recipe that impresses everyone!

Ingredients:
1 box Lemon cake mix
1 box Lemon flavored instant pudding
4 eggs
1/3 cup vegetable oil
3/4 cup Key Lime Juice
1/4 cup water
Zest of 1 lime
Can of cream cheese frosting


Directions:
  1. Preheat oven to 350°F . Prep your Bundt pan with Pam or any type of grease or flour.
  2. Combine all your ingredients (except for the frosting) in a mixer, and mix on medium speed for 2 minutes. Pour batter into prepped Bundt pan.
  3. Bake for 45-50 minutes. Once you remove it from the oven, let it sit in the pan for about 10 minutes on a cooling rack. After resting, take it out of the pan and sit on cooling rack until completely cooled. Transfer to plate or platter of your choice.
  4. When ready to frost the cake, remove the lid and seal from container of frosting. Microwave for 30 seconds at a time, until frosting is pourable.
  5. Casually pour the melted frosting over the cake, looking like a complete domestic diva.
This cake is fabulous and easy for so many occasions. And you can change it up with different cake flavors and juices. I think a chocolate cake with coffee used in place of the juice and water, along with some melted Nutella drizzed on top would be wonderful!

Monday, February 1, 2010

Quiche Lorraine


Ah, the wonders of Quiche. A recipe that uses ingredients that most people have readily available to them. A bit of this, a bit of that, and you've got yourself a delicious breakfast or brunch entree. We had some refrigerated pie crusts that we had bought extras for some Christmas baking that we didn't use.

Classic Quiche Lorraine traditionally is made with bacon, but Julia Child says that it has NO CHEESE. Well where's the fun in that? I grabbed some leftover bacon from the morning's breakfast, some shredded swiss, and some frozen chopped spinach and got to work.

For those that like to take the easy route, grab your thawed pre-packaged pie crust and place it into a high sided pie pan. Press it lightly around the edges, making sure not to tear. Take a piece of foil, press it into the pie crust, and bake at 425 degrees for 10 minutes. After 10 minutes, remove the foil, and check for bubbles in the crust. Press down any bubbles, and put the crust back into the oven for 3 minutes. Remove pan from oven and set to the side.

The egg base of the quiche is the following:

  • 5 large eggs
  • 2 cups of heavy whipping cream (you could also use half and half)
  • 1/4 tsp pepper
  • 1/4 tsp salt
  • 1/4 tsp paprika
  • I also added 1/4 tsp of dried mustard, 1/2 tsp garlic powder to my mix for extra flavor!

Crack your eggs into a bowl and whisk until they are all combined, then add all other ingredients. Once you have this egg mixture, the possibilities of your own quiche are endless. My quiche had 7 slices of bacon that I finely chopped, 1 1/2 cups of shredded swiss cheese, 1 chopped green onion and a half a package of frozen chopped spinach that I had thawed and squeezed out all the moisture.

Take your filling ingredients and place them into the baked pie crust. I like to mix mine up for even coverage throughout the quiche. I even save a little of the cheese to sprinkle on top before baking. Pour your egg mixture over the filling, then bake at 325 degrees for 45-50 minutes. When it's done, it should not be jiggly, it should be firm. Let stand for 10 minutes before eating. This is also a dish that's served well at room temperature or even cold. One of my favorite lunches is a slice of this paired with a small salad!

Some other ingredients that are wonderful in quiche are :

  • leftover ham, chopped
  • sliced mushrooms
  • sharp cheddar
  • cooked leeks
  • blanched and chopped asparagus
  • cooked and crumbled sausage
  • crab

As I said before, there are endless possibilities in the world of quiche.... just take whatever is leftover in your fridge and go wild!


Friday, October 23, 2009

Martha Stewart's Perfect Roasted Chicken


Consider this one an essential recipe. Everyone should know how to make a roast chicken. It's such a simple meal, most everyone will love it and the directions couldn't be any easier. And you can make it YOURS just by changing the flavors.

What you'll need:

  • A roaster chicken ( these were on sale for 2.99 each at Target a few weeks back!)
  • 2 TBS of unsalted butter, softened
  • salt and pepper
  • 1 lemon
  • 3 garlic cloves, smashed
  • herbs of your choice ( I used rosemary and thyme)

Once thawed, let your chicken come to room temperature by letting it sit out for 30 minutes to an hour, depending on the size of the bird. Pre-heat your oven to 425°. Wash the chicken, and then you will need to dry it. Why dry it? Because meat browns better when it's dry!

Your next step is to remove any of the giblets, etc party favors inside the chicken. Then salt and pepper the cavity. Throw in your lemon wedges, garlic, and herbs. Then you'll need to truss the chicken. (Click here for a video showing you how to do that) Once trussed, grab that softened butter and give the chicken a good rub down all over. Liberally sprinkle the buttered surface with salt and pepper, and place the bird breast side up in a roasting pan.

I like to have some sort of root veggies cooking along with the chicken, so I found some yellow creamy new potatoes, chopped them in quarters, tossed in olive oil, salt, pepper, and thyme. I put them in the pan surrounding the chicken, and added a splash of white wine. Sounds weird, but trust me on this, it's a great step not to miss.

Roast the chicken in your 425° until the skin is golden brown and the juices run clear when pierced, and that took me about an hour and a half. If you're not sure, use a thermometer and the breast should read at 180° and the thigh should be 190°.

As tempting as it may seem to cut right into that chicken, WAIT. Let that beautiful bird sit for 10-15 minutes so the juices have time to re-distribute throughout the chicken. This is a mistake many people make after cooking meat and they wonder why it's dry. Remember this step!

Slice and enjoy, and turn your leftover chicken into a delicious chicken salad the next day :)

Recipe was from Martha Stewart's Cooking School, which I HIGHLY recommend if you're a new or semi-pro home cook!